
 |
Enlightenment DR17 User GuideThis is the Get-E.org Enlightenment DR17 User Guide. Please note that this guide only covers the E17 windowmanager and its dependencies. For information on other EFL based programs, consult the EFL user guide instead. 1 - About This GuideThis section has the basic information about this guide. In particular please read the disclaimer as Enlightenment DR17 is still under heavy development. If you want to try out Enlightenment DR17, you should first understand and acknowledge the current development state and the risks involved with using and installing unreleased pre-alpha software. 1.1 - DisclaimerThe authors of this guide and the Enlightenment developers are not responsible for any damages caused by following this guide or by using the programs and libraries covered in this guide. Enlightenment DR17 (E17) and the Enlightenment Foundation Libraries (EFL) covered in this guide have not been released yet. The current CVS versions of the various programs/libraries do not represent the final releases and are not feature complete or stable in the classic sense of the word. Everything is still under heavy development and none of these libraries or programs are officially supported by the Enlightenment project yet. In other words, don't be surprised if and when you encounter bugs or if something doesn't work correctly. E17 and EFL based applications are meant for developers only at the moment, but everyone is welcome to play around with them of course. This guide is meant to be read as a book, from the beginning to the end, so if you skip sections you might miss some important things that were explained earlier. Even though it's a bit early for documentation as most things will change before release, the early adopters and testers might find this guide useful :-) This guide is licensed under Creative Commons Attribution 2.5. The full legal text for the license can be read here. 1.2 - CreditsThis guide is written and maintained by the Get-E.org staff. If you have any comments, suggestions or perhaps notice that some section of the guide is out of date, please don't hesitate to contact us. In particular, email Christopher 'devilhorns' Michael. If we don't know something is broken, it's quite difficult to fix it. 1.3 - StatusThis guide was last updated on January 31, 2007. Everything should be more or less up to date. 2 - About EnlightenmentThis section will give you a brief introduction to Enlightenment DR17 and it's many features.2.1 - Introduction Enlightenment DR17 (E17) is a desktop shell based on the Enlightenment Foundation Libraries. You may ask "What is a desktop shell?". A desktop shell is not simply a window manager, nor is it just a desktop environment. In addition to being able to manage your windows, E17 has an integrated file manager and other functionality that make it more than a basic window manager. This middle ground is what the Enlightenment developers call a desktop shell. The Enlightenment project's lead developer is Carsten 'rasterman' Haitzler. 2.2 - FeaturesListed below are some of E17's many features. This list is subject to change as development progresses.
3 - Installing EnlightenmentThis section includes instructions for installing Enlightenment DR17 on various Linux distributions. 3.1 - Installation from CVSEnlightenment DR17 hasn't been released yet so you will need to get a current development version directly from CVS or use the snapshots available at http://enlightenment.freedesktop.org. If you don't know what CVS is, or need some more information about it, check http://www.nongnu.org/cvs. There are unofficial binary packages (made from CVS snapshots) available for some distributions, but that is covered in the next section. Enlightenment DR17 is based on the Enlightenment Foundation Libraries (EFL). In order to be able to install E17, and the EFL libraries it requires, you will need a sane build environment. The following is a list of general, non distro-specific, dependencies that need to be satisfied before you can proceed. Please note that your distribution may have these dependencies named differently.
Now that you have a sane build environment, you may proceed to install the EFL libraries. You will need to first install the following EFL libraries in the order listed:
Getting EFL Libraries and E17 From CvsTo download the source code for these libraries (and for E17) from CVS, use the following commands as a user account. Note there is no password for the login, when prompted just press enter. A directory called "e17" will be created inside the directory from which you run these commands: $ cvs -d:pserver:anoncvs@anoncvs.enlightenment.org:/var/cvs/e login $ cvs -z3 -d:pserver:anoncvs@anoncvs.enlightenment.org:/var/cvs/e co e17/libs/eet $ cvs -z3 -d:pserver:anoncvs@anoncvs.enlightenment.org:/var/cvs/e co e17/libs/evas $ cvs -z3 -d:pserver:anoncvs@anoncvs.enlightenment.org:/var/cvs/e co e17/libs/ecore $ cvs -z3 -d:pserver:anoncvs@anoncvs.enlightenment.org:/var/cvs/e co e17/libs/efreet $ cvs -z3 -d:pserver:anoncvs@anoncvs.enlightenment.org:/var/cvs/e co e17/libs/embryo $ cvs -z3 -d:pserver:anoncvs@anoncvs.enlightenment.org:/var/cvs/e co e17/libs/edje $ cvs -z3 -d:pserver:anoncvs@anoncvs.enlightenment.org:/var/cvs/e co e17/apps/e $ cvs -d:pserver:anoncvs@anoncvs.enlightenment.org:/var/cvs/e logout Installing EFL Libraries and E17Now that you have downloaded the required EFL libraries, let's install them. After this you can start installing E17 itself using similar commands which will be covered further in this book. You will need to enter the corresponding directories, in the order specified earlier, and compile & install them. You are probably already familiar with the following basic steps: $ ./autogen.sh $ make $ make install (as root) By default, the EFL libraries will install to If you are having some autogen or automake related problems, you can specify the version needed manually by adding this at the top of the #!/bin/sh export WANT_AUTOCONF=2.5 export WANT_AUTOMAKE=1.7 Please note that there are known problems with using automake-1.10 and currently is not supported for building Enlightenment or any EFL libraries. Make sure you have the right paths configured in Now you can move on to installing E17 itself. If you want to install E17 in a prefix other than the usual ones, for example in your home directory, then you'll need to pass a prefix to autogen.sh: $ ./autogen.sh --prefix=/path/to/install E17 is relocatable, it will determine the install prefix on the fly when it is run so, for example, you can use the prefix 3.2 - Distribution Specific InstallationThis section contains various distribution related notes and has links to some known unofficial E17 package repositories. Get-E.org and the Enlightenment project do not, in any way, endorse any of these unofficial package repositories Debian:There's an unofficial E17/EFL package repository maintained by Blake 'shadoi' Barnett for Debian Sid (unstable). See http://shadoi.soulmachine.net for more details. Blake 'shadoi' Barnett is a member of the Enlightenment team, where he handles Debian packaging. If you have any questions regarding the packages, please contact him directly. Fedora Core:There is an unofficial E17/EFL RPM repository maintained by Didier F.B. Casse (Prodigy) at http://sps.nus.edu.sg/~didierbe. Prodigy is a member of the Enlightenment team where he's responsible for Fedora Core packaging. If you have any questions about the packages, please contact Didier F.B. Casse directly. Foresight Linux:The Foresight Linux community has set up some wiki pages with some distro-specific Enlightenment related information. Check http://wiki.foresightlinux.com/index.php/Enlightenment for English information. There's also a German page at http://wiki.foresightlinux.com/index.php/Enlightenment_Deutsch. Note that these sites are not related to us, nor do we have any control over their content, so if you have any comments about them, contact the Foresight Linux team directly. Gentoo:There are ebuilds in Portage for all EFL and most programs that use them. In addition to snapshots that are updated every few weeks, there are also live CVS ebuilds available. This can sometimes change though, sometimes there are only CVS ebuilds available for certain libraries/programs. Check the Gentoo package database to see the current situation. All CVS ebuilds have sudo as a dependency, so it will also be installed if you use the CVS ebuilds. It can be considered to be a security risk. The default sudo config file should not allow much though, so unless you edit it to allow insecure stuff it shouldn't be a problem on normal non mission-critical desktop systems. This is of course a question of opinion so you'll have to decide for yourself if you consider it a risk. Another thing you should know is that the CVS ebuilds obviously don't check md5sums. The CVS ebuilds will also use root for all steps of the installation and may not always work, depending on the current CVS situation. The CVS ebuilds are marked with the -* keyword while the snapshots are marked ~arch. Obviously neither the snapshots or the CVS ebuilds are marked stable. These ebuilds are maintained by Mike Frysinger (vapier@gentoo.org). If your whole system is set to ACCEPT_KEYWORDS="~arch", you of course won't have to make an /etc/portage/package.keywords file if you wish to use the snapshots, but if you want to use the CVS ebuilds you will have to use one. Please read the official Gentoo Portage documentation for more precise information on Gentoo's package manager and especially the keyword system. Here is an example /etc/portage/package.keywords configuration file, which includes CVS keywords for the Enlightenment related programs and libraries discussed in this guide: x11-wm/e -* x11-libs/evas -* dev-libs/eet -* x11-libs/ecore -* media-libs/edje -* dev-libs/embryo -* If you wish to use the snapshots instead, and are running a stable (arch) system, replace the -* with ~arch. For most people (those using Intel compatible 32 bit x86 processors) this means ~x86. Note that you should not mix -* and ~x86 ebuilds. Another important thing to remember is that you need to manually specify the ebuilds in the correct order when you emerge them. This is because if you already have E17 installed, running "emerge e" will only update the E17 window manager itself, and not the EFL - in which case it'll most likely fail to compile as the libraries are also under development. The other reason is because even if you don't have E17 installed, Portage will not emerge the libraries in the correct order if you simply "emerge e" and let Portage take care of the dependencies. Here is the correct emerge line (this will install or update in a correct order): emerge eet evas ecore embryo edje e Note that sometimes there may not always be ~arch (snapshot) versions of these ebuilds available. If you have trouble with these directions, you may want to check out this Gentoo Wiki Page. Ubuntu GNU/Linux:There's an unofficial E17/EFL package repository maintained by Blake 'shadoi' Barnett for Ubuntu Breezy. See http://shadoi.soulmachine.net for more details. Blake 'shadoi' Barnett is a member of the Enlightenment team, where he handles Debian packaging. If you have any questions regarding the packages, please contact him directly. There's also a HOWTO thread on the Ubuntu forums discussing E17 installation using a certain CVS compile script. Arch Linux:Arch Linux maintains a distro-specific wiki page for e17 here. 3.3 - BSD Specific InstallationE17 on NetBSD and OpenBSD Enlightenment DR17 is not working properly on NetBSD and OpenBSD, because of their C librarys. They are not C99 compliant and they are not supporting the And of course, there are no guarantees that it will work. E17 on FreeBSD and FreeBSD-based Operating Systems (such as PC-BSD) Installing from ports cd /usr/ports/x11-wm/enlightenment-devel && make install clean This will install the Enlightenment DR17 window manager itself and the libs that it needs. You will also find some themes and modules in the ports collection. We cannot list them all here, because the list will change, but you can do something like this to find them: ls /usr/ports/x11-themes/e17-* ls /usr/ports/x11/e17-* Or simply open this link which will query the FreeBSD ports collection. Installing from CVS Simply follow the "Installation from CVS" portion of this guide, but before you run
export CFLAGS=" -lintl -liconv -g -L/usr/X11R6/lib -L/usr/local/lib -I/usr/local/include -I/usr/X11R6/include" export PATH=/home/user/bin:/usr/local/gnu-autotools/bin:/usr/local/bin:/usr/local/sbin:/bin:/usr/bin:/usr/X11R6/bin:/usr/X11R6/sbin:/usr/games:/sbin:/usr/sbin:.: export ACLOCAL_FLAGS=' -I /usr/local/share/aclocal' NOTE: if you're using a C-like shell, use the "setenv" command instead of "export". NOTE: You may need to symlink /usr/local/gnu-autotools/aclocal-1.9 to /usr/local/gnu-autotools/bin/aclocal. Thats it. You are ready to compile Enlightenment DR17. Follow the instructions in "Installation from CVS" section. 4 - Starting EnlightenmentThis section contains instructions for starting E17. 4.1 - Starting from the command-lineIf you wish to start E17 directly from the command line, all you need to do is create the following file: exec /path/to/enlightenment_start After this, a simple 4.2 - Starting from a graphical login managerIf you wish to start E17 from a graphical login manager, you will need to first create an option for it. How to do this depends on the login manager in question - please consult its documentation. 4.2.1 - EntranceEntrance is the E17 login manager. It can display animations, all kinds of nice effects and is fully themeable. The Entrance project owner is Ibukun Olumuyiwa (xcomputerman). Please note that Entrance is still in early development, so you may experience serious bugs.  The following links may be of interest if you are trying to setup entrance as your login manager. http://gentoo-wiki.com/HOWTO_emerge_e17#Configuring_Login_Manager http://edevelop.org/node/1632 5 - Welcome to EnlightenmentCongratulations on getting Enlightenment DR17 installed !! What follows is a basic introduction for new users of E17. 5.1 - Basic FunctionalityWhen you first login into E17, you will be greeted with a desktop that looks similar to this: 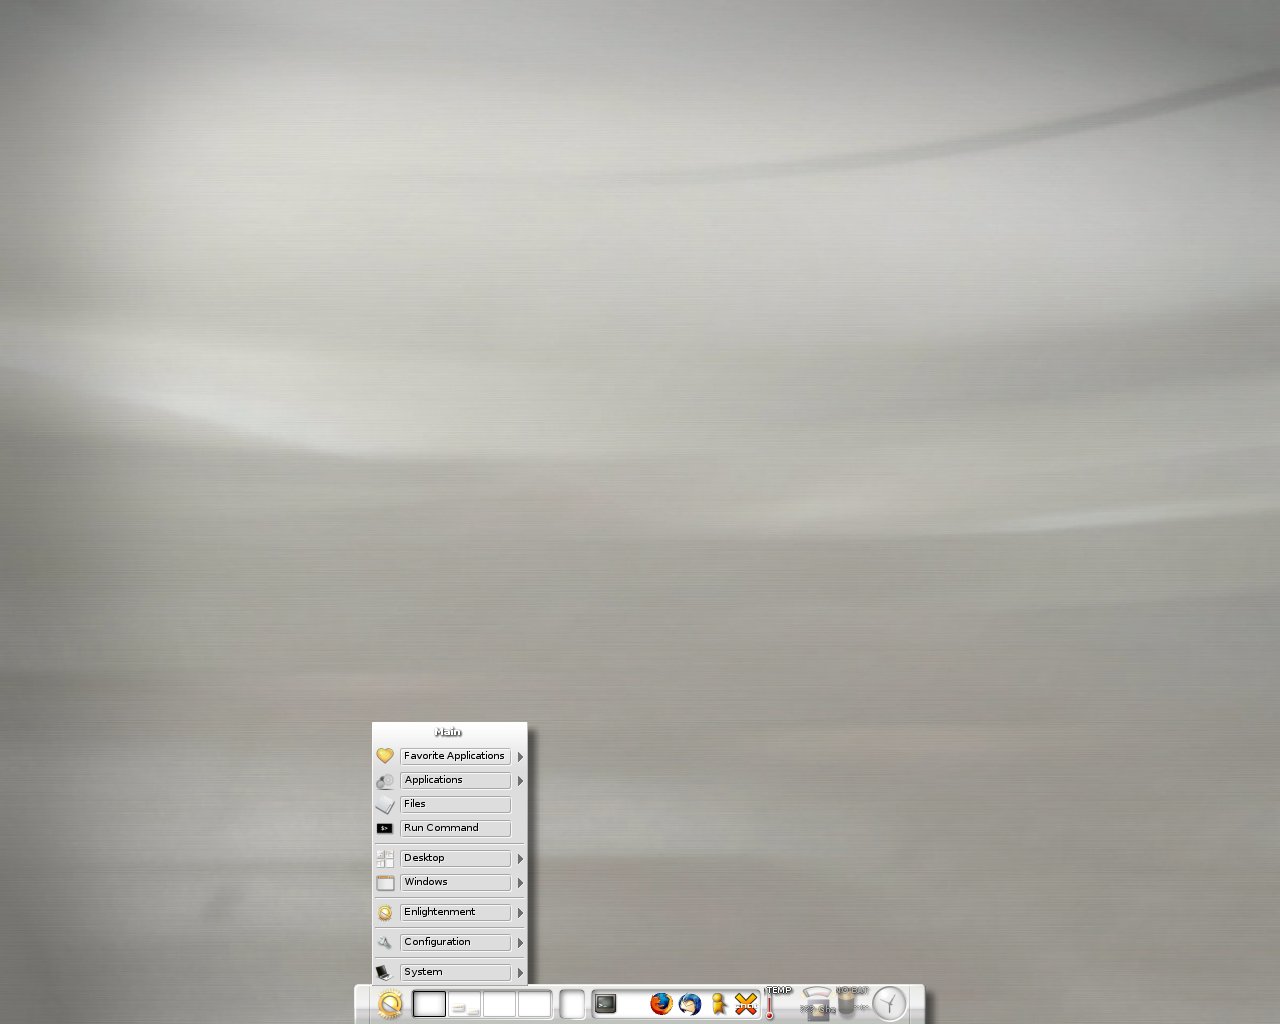
The golden Enlightenment logo on the bottom-left corner is the E17 Start button module which brings up the main E17 menu. This same menu can also be reached by left-clicking anywhere on the desktop background. Next to this is the pager, which has four virtual desktops by default. Following the pager is the IBox module which is used to hold iconified applications. In the middle, you can see the IBar module, which is E17's application starter bar. By default it contains five icons to get you started (from left to right): X Terminal, Mozilla Firefox, X-Chat, The Gimp and XMMS. More applications can be started from the E17 menu, under "Favorite Applications". Last but not least, you can see two enabled gadgets on the right: a temperature display, and a clock. All of this is highly configurable. In fact there are loadable modules that can be enabled or disabled, and even completely unloaded from memory. The first thing you will probably notice are the various graphics effects and animations: focus effects are fully animated, a golden follower graphic follows your mouse pointer when you move over one of the icons on the IBar, the start button has a pulse effect when active and the list goes on. All this is done via software, there is no hardware acceleration enabled. There are other rendering engines available, but by default everything is rendered via a highly optimized software engine. Even with all these effects, Enlightenment is still conservative when it comes to system resources. 5.2 - File ManagementE17 includes a built-in file manager called EFM (Enlightenment File Manager). This part of E17 is still in early development though, so it is not recommended to use EFM for handing any important files ! Data loss may occur !! Here are some screenshots until we manage to finish this section. This is the file manager itself:  5.3 - Main MenuThe main E17 menu can be opened by either left-clicking the Enlightenment start button on your desktop or by left-clicking anywhere on the background image.  The main E17 menu includes the following options:
5.4 - ModulesE17 can be as light or as heavy as you want it to be. The modules system is one of the things that makes this possible.
Modules add a certain feature to the window manager. Once loaded, the feature included in the module is part of the window manager itself. This has its downside too: if a module goes down, it will most likely crash the window manager itself. The following is a list of modules included with E17:
By default all of these modules are loaded except for the ibox module. Third party modules can be found via cvs: $ cvs -d:pserver:anoncvs@anoncvs.enlightenment.org:/var/cvs/e login $ cvs -z3 -d:pserver:anoncvs@anoncvs.enlightenment.org:/var/cvs/e co e_modules $ cvs -d:pserver:anoncvs@anoncvs.enlightenment.org:/var/cvs/e logout Here's an example of what some included and third party modules can look like: 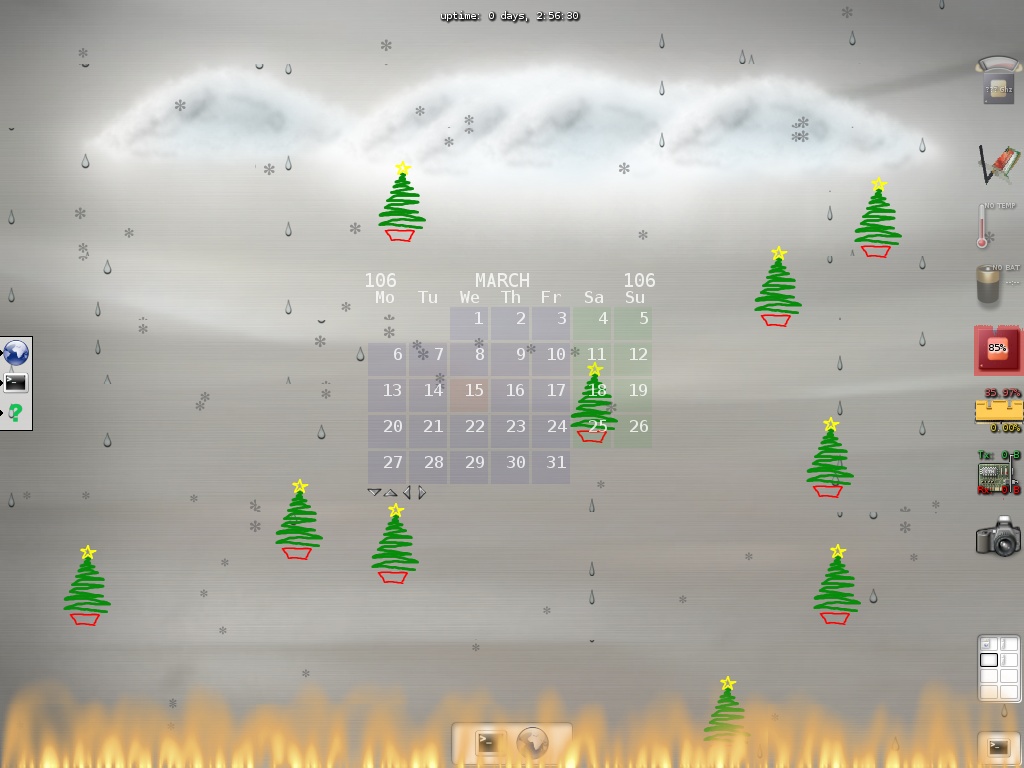 There are two ways to load, unload, enable and disable modules (both covered later in this guide):
Note that if you keep a module loaded but not enabled, it will still use memory, so if you wish to minimize memory usage, unload the modules you don't need. 5.5 - Window BordersThe window status menu has the following options: 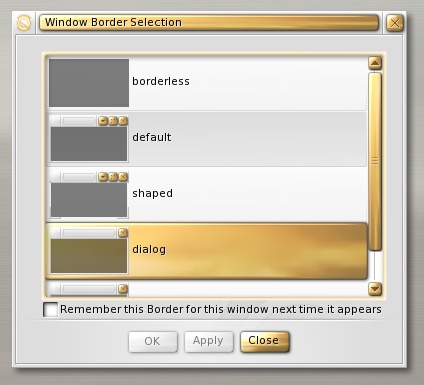 The above image is an example of E17's default window borders and of the window status menu. You are probably already familiar with the basic layout (on the top-left corner there's the icon section, then the title bar, and last on the right you can see the standard minimize, maximize and close buttons), but there are a few things that aren't that common. First of all, the icon on the top-left corner can be replaced with any picture you wish - by default a window shaped icon is displayed. On the right side of the image you can see the E17 window status menu. This menu can be opened by either left-clicking the window icon, by right-clicking anywhere on the titlebar area, or by ALT+right-clicking anywhere on the window. The window status menu has the following options:
Here is an example screenshot of the window locks/remember settings dialogs: 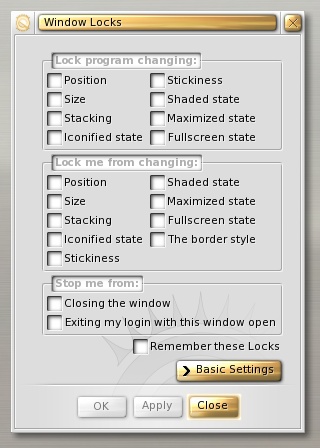 Also note that by default E17 has edge flipping: if you move the mouse cursor to the edge of the screen, E17 will jump to the next desktop. Windows can also be dragged to other desktops this way. 5.6 - Window ListE17 also includes an Alt+tab system (a popup window for easy and fast switching focus between applications), which behaves just like in KDE/Gnome etc. It looks like this:  When configuring the Window List Settings in Basic Mode, you will see a screen similar to this: 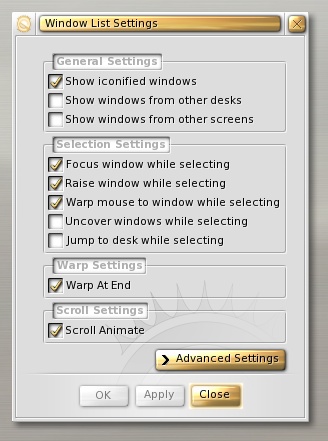 When configuring the Window List Settings in Advanced Mode, you will see a screen similar to this: 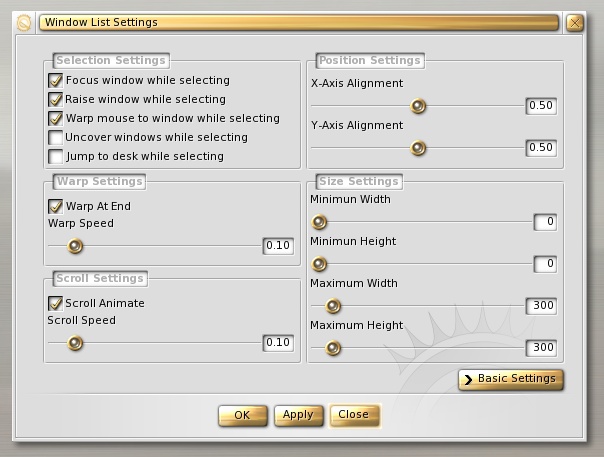 6 - Configuring EnlightenmentE17 currently has two available methods of configuration:
The following sections contain information pertaining to each method 6.1 - Configuring via command-lineE17 does not have a graphical user interface for configuring most things. Everything can be configured via a command-line tool called Here's are all the options for
OPTIONS:
-h This help
-help This help
--help This help
--h This help
-display OPT1 Connect to E running on display 'OPT1'
-start-efm OPT1 Starts the E File Manager in Directory 'OPT1'
-module-load OPT1 Loads the module named 'OPT1' into memory
-module-unload OPT1 Unloads the module named 'OPT1' from memory
-module-enable OPT1 Enable the module named 'OPT1'
-module-disable OPT1 Disable the module named 'OPT1'
-module-list List all loaded modules
-default-bg-set OPT1 Set the default background edje to the desktop background in the file 'OPT1' (must be a full path)
-default-bg-get Get the default background edje file path
-font-available-list List all available fonts
-font-apply Apply font settings changes
-font-fallback-append OPT1 Append OPT1 to the fontset
-font-fallback-prepend OPT1 Prepend OPT1 to the fontset
-font-fallback-list List the fallback fonts in order
-font-fallback-remove OPT1 Remove OPT1 from the fontset
-font-default-set OPT1 OPT2 OPT3 Set textclass (OPT1) font (OPT2) and size (OPT3)
-font-default-get OPT1 List the default font associated with OPT1
-font-default-remove OPT1 Remove the default text class OPT1
-font-default-list List all configured text classes
-font-fallback-clear Clear list of fallback fonts
-restart Restart Enlightenment
-shutdown Shutdown (exit) Enlightenment
-lang-list List all available languages
-lang-set OPT1 Set the current language to 'OPT1'
-lang-get Get the current language
-dirs-list OPT1 List the directory of type specified by 'OPT1', try 'themes'
-dirs-list-append OPT1 OPT2 Append the directory of type specified by 'OPT2' to the list in 'OPT1'
-dirs-list-prepend OPT1 OPT2 Prepend the directory of type specified by 'OPT2' to the list in 'OPT1'
-dirs-list-remove OPT1 OPT2 Remove the directory of type specified by 'OPT2' from the list in 'OPT1'
-framerate-set OPT1 Set the animation framerate (fps)
-framerate-get Get the animation framerate (fps)
-menus-scroll-speed-set OPT1 Set the scroll speed of menus (pixels/sec)
-menus-scroll-speed-get Get the scroll speed of menus (pixels/sec)
-focus-policy-set OPT1 Set the focus policy. OPT1 = CLICK, MOUSE or SLOPPY
-focus-policy-get Get focus policy
-edge-flip-set OPT1 Set the edge flip flag (0/1)
-edge-flip-get Get the edge flip flag
-edge-flip-timeout-set OPT1 Set the edge flip timeout (sec)
-edge-flip-timeout-get Get the edge flip timeout
-font-cache-set OPT1 Set the font cache size (Kb)
-font-cache-get Get the speculative font cache size (Kb)
-image-cache-set OPT1 Set the image cache size (Kb)
-image-cache-get Get the speculative image cache size (Kb)
-menus-fast-move-threshold-set OPT1 Set the mouse speed (pixels/second) that is considered a 'fast move'
-menus-fast-move-threshold-get Get the mouse speed (pixels/second) that is considered a 'fast move'
-menus-click-drag-timeout-set OPT1 Set the time (in sec) between a mouse press and release that will keep the menu up anyway
-menus-click-drag-timeout-get Get the time (in sec) between a mouse press and release that will keep the menu up anyway
-border-shade-animate-set OPT1 Set the shading animation flag (0/1)
-border-shade-animate-get Get the shading animation flag (0/1)
-border-shade-transition-set OPT1 Set the shading animation algorithm (0, 1, 2 or 3)
-border-shade-transition-get Get the shading animation algorithm (0, 1, 2 or 3)
-border-shade-speed-set OPT1 Set the shading speed (pixels/sec)
-border-shade-speed-get Get the shading speed (pixels/sec)
-desks-set OPT1 OPT2 Set the number of virtual desktops (X x Y desks OPT1 = X, OPT2 = Y)
-desks-get Get the number of virtual desktops
-maximize-policy-set OPT1 Set the maximize policy. OPT1 = FULLSCREEN, SMART, EXPAND or FILL
-maximize-policy-get Get maximize policy
-binding-mouse-list List all mouse bindings
-binding-mouse-add OPT1 OPT2 OPT3 OPT4 OPT5 OPT6 Add an existing mouse binding.
-binding-mouse-del OPT1 OPT2 OPT3 OPT4 OPT5 OPT6 Delete an existing mouse binding.
-binding-key-list List all key bindings
-binding-key-add OPT1 OPT2 OPT3 OPT4 OPT5 OPT6 Add an existing key binding.
-binding-key-del OPT1 OPT2 OPT3 OPT4 OPT5 OPT6 Delete an existing key binding.
-always-click-to-raise-set OPT1 Set the always click to raise policy, 1 for enabled 0 for disabled
-always-click-to-raise-get Get the always click to raise policy, 1 for enabled 0 for disabled
-always-click-to-focus-set OPT1 Set the always click to focus policy, 1 for enabled 0 for disabled
-always-click-to-focus-get Get the always click to focus policy, 1 for enabled 0 for disabled
-use-auto-raise-set OPT1 Set use auto raise policy, 1 for enabled 0 for disabled
-use-auto-raise-get Get use auto raise policy, 1 for enabled 0 for disabled
-pass-click-on-set OPT1 Set pass click on policy, 1 for enabled 0 for disabled
-pass-click-on-get Get pass click on policy, 1 for enabled 0 for disabled
-auto-raise-delay-set OPT1 Set the auto raise delay (Seconds)
-auto-raise-delay-get Get the auto raise delay (Seconds)
-use-resist-set OPT1 Set resist policy, 1 for enabled 0 for disabled
-use-resist-get Get use resist policy, 1 for enabled 0 for disabled
-drag-resist-set OPT1 Set drag resist threshold (0-100)
-drag-resist-get Get drag resist threshold
-desk-resist-set OPT1 Set desktop resist threshold (0-100)
-desk-resist-get Get desktop resist threshold
-window-resist-set OPT1 Set window resist threshold (0-100)
-window-resist-get Get window resist threshold
-gadget-resist-set OPT1 Set gadget resist threshold (0-100)
-gadget-resist-get Get gadget resist threshold
-desktop-bg-add OPT1 OPT2 OPT3 OPT4 OPT5 Add a desktop bg definition.
-desktop-bg-del OPT1 OPT2 OPT3 OPT4 Delete a desktop bg definition.
-desktop-bg-list List all current desktop bg definitions
-winlist-warp-while-selecting-set OPT1 Set winlist (alt+tab) warp while selecting policy
-winlist-warp-while-selecting-get Get winlist (alt+tab) warp while selecting policy
-winlist-warp-at-end-set OPT1 Set winlist (alt+tab) warp at end policy
-winlist-warp-at-end-get Get winlist (alt+tab) warp at end policy
-winlist-warp-speed-set OPT1 Set winlist warp speed (0.0-1.0)
-winlist-warp-speed-get Get winlist warp speed
-winlist-scroll-animate-set OPT1 Set winlist (alt+tab) scroll animate policy
-winlist-scroll-animate-get Get winlist (alt+tab) scroll animate policy
-winlist-scroll-speed-set OPT1 Set winlist scroll speed (0.0-1.0)
-winlist-scroll-speed-get Get winlist scroll speed
-winlist-list-show-iconified-set OPT1 Set whether winlist (alt+tab) will show iconfied windows
-winlist-list-show-iconified-get Get whether winlist (alt+tab) will show iconfied windows
-winlist-list-show-other-desk-windows-set OPT1 Set whether winlist (alt+tab) will show other desk windows
-winlist-list-show-other-desk-windows-get Get winlist (alt+tab) show other desk windows
-winlist-list-show-other-screen-windows-set OPT1 Set winlist (alt+tab) show other screen windows policy
-winlist-list-show-other-screen-windows-get Get winlist (alt+tab) show other screen windows policy
-winlist-list-uncover-while-selecting-set OPT1 Set whether winlist (alt+tab) will show iconified windows while selecting
-winlist-list-uncover-while-selecting-get Get whether winlist (alt+tab) will show iconified windows while selecting
-winlist-list-jump-desk-while-selecting-set OPT1 Set winlist (alt+tab) jump desk while selecting policy
-winlist-list-jump-desk-while-selecting-get Get winlist (alt+tab) jump desk while selecting policy
-winlist-pos-align-x-set OPT1 Set winlist position align for x axis (0.0-1.0)
-winlist-pos-align-x-get Get winlist position align for x axis
-winlist-pos-align-y-set OPT1 Set winlist position align for y axis (0.0-1.0)
-winlist-pos-align-y-get Get winlist position align for y axis
-winlist-pos-size-w-set OPT1 Set winlist position size width (0.0-1.0)
-winlist-pos-size-w-get Get winlist position size width
-winlist-pos-size-h-set OPT1 Set winlist position size height (0.0-1.0)
-winlist-pos-size-h-get Get winlist position size height
-winlist-pos-min-w-set OPT1 Set winlist (alt+tab) minimum width
-winlist-pos-min-w-get Get winlist (alt+tab) minimum width
-winlist-pos-min-h-set OPT1 Set winlist (alt+tab) minimum height
-winlist-pos-min-h-get Get winlist (alt+tab) minimum height
-winlist-pos-max-w-set OPT1 Set winlist (alt+tab) maximum width
-winlist-pos-max-w-get Get winlist (alt+tab) maximum width
-winlist-pos-max-h-set OPT1 Set winlist (alt+tab) maximum height
-winlist-pos-max-h-get Get winlist (alt+tab) maximum height
-kill-if-close-not-possible-set OPT1 Set whether E should kill an application if it can not close
-kill-if-close-not-possible-get Get whether E should kill an application if it can not close
-kill-process-set OPT1 Set whether E should kill the process directly or through x
-kill-process-get Get whether E should kill the process directly or through x
-kill-timer-wait-set OPT1 Set interval to wait before killing client (0.0-120.0)
-kill-timer-wait-get Get interval to wait before killing client
-ping-clients-set OPT1 Set whether E should ping clients
-ping-clients-get Get whether E should ping clients
-ping-clients-wait-set OPT1 Set client ping interval (0.0-120.0)
-ping-clients-wait-get Get client ping interval
-transition-start-set OPT1 Get the background transition used when E starts
-transition-start-get Get the background transition used when E starts
-transition-desk-set OPT1 Set the transition used when switching desktops
-transition-desk-get Get the transition used when switching desktops
-transition-change-set OPT1 Set the transition used when changing backgrounds
-transition-change-get Get the transition used when changing backgrounds
-focus-setting-set OPT1 Set the focus setting policy ("NONE", "NEW_WINDOW", "NEW_DIALOG", "NEW_DIALOG_IF_OWNER_FOCUSED")
-focus-setting-get Get the focus setting policy
-exec-action OPT1 OPT2 Executes an action given the name (OPT1) and a string of parameters (OPT2).
-theme-list List themes and associated categories
-theme-set OPT1 OPT2 Set theme category (OPT1) and edje file (OPT2)
-theme-get OPT1 List the theme associated with the category OPT1
-theme-remove OPT1 Remove the theme category OPT1
-move-info-follows-set OPT1 Set whether the move dialog should follow the client window
-move-info-follows-get Get whether the move dialog should follow the client window
-resize-info-follows-set OPT1 Set whether the resize dialog should follow the client window
-resize-info-follows-get Set whether the resize dialog should follow the client window
-move-info-visible-set OPT1 Set whether the move dialog should be visible
-move-info-visible-get Get whether the move dialog should be visible
-resize-info-visible-set OPT1 Set whether the resize dialog should be visible
-resize-info-visible-get Set whether the resize dialog should be visible
-focus-last-focused-per-desktop-set OPT1 Set whether E should remember focused windows when switching desks
-focus-last-focused-per-desktop-get Get whether E should remember focused windows when switching desks
-focus-revert-on-hide-or-close-set OPT1 Set whether E will focus the last focused window when you hide or close a focused window
-focus-revert-on-hide-or-close-get Get whether E will focus the last focused window when you hide or close a focused window
-default-profile-set OPT1 Set the default configuration profile to OPT1
-default-profile-get Get the default configuration profile
-profile-list List all existing profiles
-desktop-name-add OPT1 OPT2 OPT3 OPT4 OPT5 Add a desktop name definition.
-desktop-name-del OPT1 OPT2 OPT3 OPT4 Delete a desktop name definition.
-desktop-name-list List all current desktop name definitions
-cursor-size-set OPT1 Set the E cursor size
-cursor-size-get Get the E cursor size
-use-e-cursor-set OPT1 Set whether E's cursor should be used
-use-e-cursor-get Get whether E's cursor should be used
-menu-autoscroll-margin-set OPT1 Set the distance from the edge of the screen the menu will autoscroll to
-menu-autoscroll-margin-get Get the distance from the edge of the screen the menu will autoscroll to
-menu-autoscroll-cursor-margin-set OPT1 Set the distance from the edge of the screen the cursor needs to be to start menu autoscrolling
-menu-autoscroll-cursor-margin-get Get the distance from the edge of the screen the cursor needs to be to start menu autoscrolling
-transient-move-set OPT1 Set if transients should move with it's parent
-transient-move-get Get if transients should move with it's parent
-transient-resize-set OPT1 Set if transients should move when it's parent resizes
-transient-resize-get Get if transients should move when it's parent resizes
-transient-raise-set OPT1 Set if transients should raise with it's parent
-transient-raise-get Get if transients should raise with it's parent
-transient-lower-set OPT1 Set if transients should lower with it's parent
-transient-lower-get Get if transients should lower with it's parent
-transient-layer-set OPT1 Set if transients should change layer with it's parent
-transient-layer-get Get if transients should change layer with it's parent
-transient-desktop-set OPT1 Set if transients should change desktop with it's parent
-transient-desktop-get Get if transients should change desktop with it's parent
-transient-iconify-set OPT1 Set if transients should iconify with it's parent
-transient-iconify-get Get if transients should iconify with it's parent
-modal-windows-set OPT1 Set if enlightenment should honor modal windows
-modal-windows-get Get if enlightenment should honour modal windows
-input-method-list List all available input methods
-input-method-set OPT1 Set the current input method to 'OPT1'
-input-method-get Get the current input method
-window-placement-policy-set OPT1 Set the window placement policy. OPT1 = SMART, CURSOR or MANUAL
-window-placement-policy-get Get window placement policy
-config-panel-show Show the configuration panel
-binding-signal-list List all signal bindings
-binding-signal-add OPT1 OPT2 OPT3 OPT4 OPT5 OPT6 OPT7 Add an existing signal binding.
-binding-signal-del OPT1 OPT2 OPT3 OPT4 OPT5 OPT6 OPT7 Delete an existing signal binding.
-binding-wheel-list List all wheel bindings
-binding-wheel-add OPT1 OPT2 OPT3 OPT4 OPT5 OPT6 OPT7
-binding-wheel-del OPT1 OPT2 OPT3 OPT4 OPT5 OPT6 OPT7
-winlist-list-focus-while-selecting-set OPT1 Set winlist (alt+tab) focus while selecting policy
-winlist-list-focus-while-selecting-get Get winlist (alt+tab) focus while selecting policy
-winlist-list-raise-while-selecting-set OPT1 Set winlist (alt+tab) raise while selecting policy
-winlist-list-raise-while-selecting-get Get winlist (alt+tab) raise while selecting policy
-theme-category-list List all available theme categories
-transition-list List all available transitions
-action-list List all available actions
-profile-add OPT1 Add profile named OPT1
-profile-del OPT1 Delete profile named OPT1
-default-engine-set OPT1 Set the default rendering engine to OPT1 (SOFTWARE or XRENDER)
-default-engine-get Get the default rendering engine
-engine-list List all existing rendering engines
-engine-set OPT1 OPT2 Set the rendering engine for OPT1 to OPT2 (SOFTWARE or XRENDER)
-engine-get OPT1 Get the rendering engine for OPT1
-menu-eap-name-show-set OPT1 Set whether to show eapps' name field in menus
-menu-eap-name-show-get Get whether eapps' name field is shown in menus
-menu-eap-generic-show-set OPT1 Set whether to show eapps' generic field in menus
-menu-eap-generic-show-get Get whether eapps' generic field is shown in menus
-menu-eap-comment-show-set OPT1 Set whether to show eapps' comment field in menus
-menu-eap-comment-show-get Get whether eapps' comment field is shown in menus
-fullscreen-policy-set OPT1 Set the fullscreen policy. OPT1 = RESIZE or ZOOM
-fullscreen-policy-get Get fullscreen policy
6.1.1 - BackgroundE17 uses binary EDJ format files for backgrounds. These files may also contain animations and various effects. Please check our EDJ backgrounds sections (animated and static) if you want to download some animated or normal static EDJ background files. Setting an individual background for each desktop:By default E17 uses four virtual desktops. Each desktop can have an individual background. If you are using the default amount of virtual desktops (4x1), you can set individual backgrounds to each of the desktops with the following commands. The first command is for setting the background for the first virtual desktop, the second for the next one, and so on. $ enlightenment_remote -desktop-bg-add 0 0 0 0 /path/to/background.edj $ enlightenment_remote -desktop-bg-add 0 0 1 0 /path/to/background.edj $ enlightenment_remote -desktop-bg-add 0 0 2 0 /path/to/background.edj $ enlightenment_remote -desktop-bg-add 0 0 3 0 /path/to/background.edj There is a nice animation every time you switch to a desktop that has a different background. For more information about the To change the desktop background on the default desktop, issue this command $ enlightenment_remote -default-bg-set /path/to/background.edj 6.1.2 - FontsIt is possible to change the fonts in E17. There are some things you need to know first though:
In order to see what fonts are currently available, use the following command: $ enlightenment_remote -font-available-list REPLY <- BEGIN REPLY: "Vera-Bold-Italic" REPLY: "Vera-Normal" REPLY: "Vera-Bold" REPLY: "Vera-Italic" REPLY: "Vera-Mono-Bold-Italic" REPLY: "Vera-Mono-Bold" REPLY: "Vera-Mono-Italic" REPLY: "Vera-Mono" REPLY: "Vera-Serif" REPLY: "Vera-Serif-Bold" REPLY: "Vera" REPLY: "Baekmuk-Dotum" REPLY: "Kochi-Gothic" REPLY: "New-Sung" REPLY <- END In order to change the font, you'll need to use -font-default-set OPT1 OPT2 OPT3 - Set textclass (OPT1) font (OPT2) and size (OPT3) There are two different text-classes: $ enlightenment_remote -font-default-list REPLY: BEGIN REPLY: DEFAULT TEXT_CLASS="default" NAME="Vera-Bold-Italic" SIZE=10 REPLY: DEFAULT TEXT_CLASS="title_bar" NAME="Vera" SIZE=10 REPLY: END These are the default fonts. Now you can easily change them by using the $ enlightenment_remote -font-default-set default Vera-Bold 12 If you'd also want to switch the dialog font to the same font: $ enlightenment_remote -font-default-set title_bar Vera-Bold 12 The window dialog font should apply immediately, but you need to to run the following command in order for other font system related settings (in this case the window decoration titlebar font) to apply: $ enlightenment_remote -font-apply Now that you've changed the font settings, $ enlightenment_remote -font-default-list REPLY: BEGIN REPLY: DEFAULT TEXT_CLASS="default" NAME="Vera-Bold" SIZE=12 REPLY: DEFAULT TEXT_CLASS="title_bar" NAME="Vera-Bold" SIZE=12 REPLY: END All font changes are automatically saved. If you wish to go back to the default fonts, just run these commands and restart E17: $ enlightenment_remote -font-default-set default Vera 10 $ enlightenment_remote -font-default-set title_bar Vera 10 6.1.3 - LocalizationE17 includes various localizations. These can be changed during runtime by using the $ enlightenment_remote -lang-list REPLY <- BEGIN REPLY: "" REPLY: "en_US.UTF-8" REPLY: "ja_JP.UTF-8" REPLY: "fr_FR.UTF-8" REPLY: "es_AR.UTF-8" REPLY: "pt_BR.UTF-8" REPLY: "fi_FI.UTF-8" REPLY: "ru_RU.UTF-8" REPLY: "bg_BG.UTF-8" REPLY: "de_DE.UTF-8" REPLY: "pl_PL.UTF-8" REPLY: "zh_CN.UTF-8" REPLY: "hu_HU.UTF-8" REPLY: "sl_SI.UTF-8" REPLY: "it_IT.UTF-8" REPLY: "cs_CZ.UTF-8" REPLY: "da_DK.UTF-8" REPLY: "sk_SK.UTF-8" REPLY: "sv_SV.UTF-8" REPLY: "nb_NO.UTF-8" REPLY: "nl_NL.UTF-8" REPLY <- END As you can see, there are 20 languages to choose from. Now you can switch to a certain localisation by using the following command for example: $ enlightenment_remote -lang-set fi_FI.UTF-8 This would switch to Finnish - E17 should instantly start using the new language, you don't have to restart it. 6.1.4 - KeybindingsDefault Keybindings:Configurable keybindings are implemented in E17. Here is a list of all default keybindings: Mouse cursor over the background image:
Mouse cursor over a window:
Mouse cursor over window decoration titlebar:
When a menu is open:
Anywhere:
Customizing keybindings:Keybindings can be configured by using the command-line tool In order to view the current keyboard bindings you'll need to use the following command: $ enlightenment_remote -binding-key-list REPLY <- BEGIN REPLY: BINDING CONTEXT=ANY KEY="Left" MODIFIERS=SHIFT|ALT ANY_MOD=0 ACTION="desk_flip_by" PARAMS="-1 0" REPLY: BINDING CONTEXT=ANY KEY="Right" MODIFIERS=SHIFT|ALT ANY_MOD=0 ACTION="desk_flip_by" PARAMS="1 0" REPLY: BINDING CONTEXT=ANY KEY="Up" MODIFIERS=SHIFT|ALT ANY_MOD=0 ACTION="desk_flip_by" PARAMS="0 -1" REPLY: BINDING CONTEXT=ANY KEY="Down" MODIFIERS=SHIFT|ALT ANY_MOD=0 ACTION="desk_flip_by" PARAMS="0 1" REPLY: BINDING CONTEXT=ANY KEY="Up" MODIFIERS=CTRL|ALT ANY_MOD=0 ACTION="window_raise" PARAMS="" REPLY: BINDING CONTEXT=ANY KEY="Down" MODIFIERS=CTRL|ALT ANY_MOD=0 ACTION="window_lower" PARAMS="" REPLY: BINDING CONTEXT=ANY KEY="x" MODIFIERS=CTRL|ALT ANY_MOD=0 ACTION="window_close" PARAMS="" REPLY: BINDING CONTEXT=ANY KEY="k" MODIFIERS=CTRL|ALT ANY_MOD=0 ACTION="window_kill" PARAMS="" REPLY: BINDING CONTEXT=ANY KEY="w" MODIFIERS=CTRL|ALT ANY_MOD=0 ACTION="window_menu" PARAMS="" REPLY: BINDING CONTEXT=ANY KEY="s" MODIFIERS=CTRL|ALT ANY_MOD=0 ACTION="window_sticky_toggle" PARAMS="" REPLY: BINDING CONTEXT=ANY KEY="i" MODIFIERS=CTRL|ALT ANY_MOD=0 ACTION="window_iconic_toggle" PARAMS="" REPLY: BINDING CONTEXT=ANY KEY="f" MODIFIERS=CTRL|ALT ANY_MOD=0 ACTION="window_maximized_toggle" PARAMS="" REPLY: BINDING CONTEXT=ANY KEY="r" MODIFIERS=CTRL|ALT ANY_MOD=0 ACTION="window_shaded_toggle" PARAMS="" REPLY: BINDING CONTEXT=ANY KEY="Left" MODIFIERS=CTRL|ALT ANY_MOD=0 ACTION="desk_linear_flip_by" PARAMS="-1" REPLY: BINDING CONTEXT=ANY KEY="Right" MODIFIERS=CTRL|ALT ANY_MOD=0 ACTION="desk_linear_flip_by" PARAMS="1" REPLY: BINDING CONTEXT=ANY KEY="F1" MODIFIERS=ALT ANY_MOD=0 ACTION="desk_linear_flip_to" PARAMS="0" REPLY: BINDING CONTEXT=ANY KEY="F2" MODIFIERS=ALT ANY_MOD=0 ACTION="desk_linear_flip_to" PARAMS="1" REPLY: BINDING CONTEXT=ANY KEY="F3" MODIFIERS=ALT ANY_MOD=0 ACTION="desk_linear_flip_to" PARAMS="2" REPLY: BINDING CONTEXT=ANY KEY="F4" MODIFIERS=ALT ANY_MOD=0 ACTION="desk_linear_flip_to" PARAMS="3" REPLY: BINDING CONTEXT=ANY KEY="F5" MODIFIERS=ALT ANY_MOD=0 ACTION="desk_linear_flip_to" PARAMS="4" REPLY: BINDING CONTEXT=ANY KEY="F6" MODIFIERS=ALT ANY_MOD=0 ACTION="desk_linear_flip_to" PARAMS="5" REPLY: BINDING CONTEXT=ANY KEY="F7" MODIFIERS=ALT ANY_MOD=0 ACTION="desk_linear_flip_to" PARAMS="6" REPLY: BINDING CONTEXT=ANY KEY="F8" MODIFIERS=ALT ANY_MOD=0 ACTION="desk_linear_flip_to" PARAMS="7" REPLY: BINDING CONTEXT=ANY KEY="F9" MODIFIERS=ALT ANY_MOD=0 ACTION="desk_linear_flip_to" PARAMS="8" REPLY: BINDING CONTEXT=ANY KEY="F10" MODIFIERS=ALT ANY_MOD=0 ACTION="desk_linear_flip_to" PARAMS="9" REPLY: BINDING CONTEXT=ANY KEY="F11" MODIFIERS=ALT ANY_MOD=0 ACTION="desk_linear_flip_to" PARAMS="10" REPLY: BINDING CONTEXT=ANY KEY="F12" MODIFIERS=ALT ANY_MOD=0 ACTION="desk_linear_flip_to" PARAMS="11" REPLY: BINDING CONTEXT=ANY KEY="m" MODIFIERS=CTRL|ALT ANY_MOD=0 ACTION="menu_show" PARAMS="main" REPLY: BINDING CONTEXT=ANY KEY="a" MODIFIERS=CTRL|ALT ANY_MOD=0 ACTION="menu_show" PARAMS="favorites" REPLY: BINDING CONTEXT=ANY KEY="Menu" MODIFIERS=NONE ANY_MOD=0 ACTION="menu_show" PARAMS="main" REPLY: BINDING CONTEXT=ANY KEY="Menu" MODIFIERS=CTRL ANY_MOD=0 ACTION="menu_show" PARAMS="clients" REPLY: BINDING CONTEXT=ANY KEY="Menu" MODIFIERS=ALT ANY_MOD=0 ACTION="menu_show" PARAMS="favorites" REPLY: BINDING CONTEXT=ANY KEY="Insert" MODIFIERS=CTRL|ALT ANY_MOD=0 ACTION="exec" PARAMS="Eterm" REPLY: BINDING CONTEXT=ANY KEY="Tab" MODIFIERS=ALT ANY_MOD=0 ACTION="winlist" PARAMS="next" REPLY: BINDING CONTEXT=ANY KEY="Tab" MODIFIERS=SHIFT|ALT ANY_MOD=0 ACTION="winlist" PARAMS="prev" REPLY: BINDING CONTEXT=ANY KEY="g" MODIFIERS=CTRL|ALT ANY_MOD=0 ACTION="edit_mode_toggle" PARAMS="" REPLY: BINDING CONTEXT=ANY KEY="End" MODIFIERS=CTRL|ALT ANY_MOD=0 ACTION="restart" PARAMS="" REPLY: BINDING CONTEXT=ANY KEY="Delete" MODIFIERS=CTRL|ALT ANY_MOD=0 ACTION="exit" PARAMS="" REPLY <- END When setting up a keyboard binding to execute programs, remember to set the ACTION param to "exec" and set the PARAMS to the name of the program. Here is an example: REPLY: BINDING CONTEXT=ANY KEY="Insert" MODIFIERS=CTRL|ALT ANY_MOD=0 ACTION="exec" PARAMS="Eterm" In order to see the current mouse bindings: $ enlightenment_remote -binding-mouse-list REPLY <- BEGIN REPLY: BINDING CONTEXT=BORDER BUTTON=1 MODIFIERS=ALT ANY_MOD=0 ACTION="window_move" PARAMS="" REPLY: BINDING CONTEXT=BORDER BUTTON=2 MODIFIERS=ALT ANY_MOD=0 ACTION="window_resize" PARAMS="" REPLY: BINDING CONTEXT=BORDER BUTTON=3 MODIFIERS=ALT ANY_MOD=0 ACTION="window_menu" PARAMS="" REPLY: BINDING CONTEXT=ZONE BUTTON=1 MODIFIERS=NONE ANY_MOD=0 ACTION="menu_show" PARAMS="main" REPLY: BINDING CONTEXT=ZONE BUTTON=2 MODIFIERS=NONE ANY_MOD=0 ACTION="menu_show" PARAMS="clients" REPLY: BINDING CONTEXT=ZONE BUTTON=3 MODIFIERS=NONE ANY_MOD=0 ACTION="menu_show" PARAMS="favorites" REPLY: BINDING CONTEXT=CONTAINER BUTTON=1 MODIFIERS=ALT ANY_MOD=0 ACTION="edit_mode" PARAMS="" REPLY <- END Both mouse and keyboard bindings may be customized with the following commands (this is taken directly from -binding-mouse-list List all mouse bindings -binding-mouse-add OPT1 OPT2 OPT3 OPT4 OPT5 OPT6 -binding-mouse-del OPT1 OPT2 OPT3 OPT4 OPT5 OPT6 -binding-key-list List all key bindings -binding-key-add OPT1 OPT2 OPT3 OPT4 OPT5 OPT6 -binding-key-del OPT1 OPT2 OPT3 OPT4 OPT5 OPT6 The -binding-mouse-add and -binding-mouse-del commands require the following OPT arguments: OPT1 = Context, OPT2 = button, OPT3 = modifiers, OPT4 = any modifier ok, OPT5 = action, OPT6 = action parameters The -binding-key-add and -binding-key-del commands in other hand require the following OPT arguments: OPT1 = Context, OPT2 = key, OPT3 = modifiers, OPT4 = any modifier ok, OPT5 = action, OPT6 = action parameters Unfortunately we do not have a list available of what modifiers are accepted, so changing keybindings like this is a bit awkward for users. As already mentioned, there's eventually going to be a graphical user interface for all this though. 6.1.5 - ModulesIf you wish to use the command-line $ enlightenment_remote --help To see what modules are currently loaded, check the main E17 menu or issue the following command: $ enlightenment_remote -module-list It will display something like: REPLY: BEGIN REPLY: MODULE NAME="ibar" ENABLED=0 REPLY: MODULE NAME="dropshadow" ENABLED=1 REPLY: MODULE NAME="clock" ENABLED=1 REPLY: MODULE NAME="pager" ENABLED=1 Now in order to load,unload,enable, or disable a module, issue one of these commands: $ enlightenment_remote -module-load modulename $ enlightenment_remote -module-unload modulename $ enlightenment_remote -module-enable modulename $ enlightenment_remote -module-disable modulename 6.1.6 - PerformanceE17 is highly scalable. Even with all its graphical effects and animations, it tries to be conservative when it comes to resource usage. There are several ways to tweak performance though. If you have some extra RAM, you may want to increase the E17 font and image caches. This helps reduce swapping, for example if you switch backgrounds often. This is configured via the -font-cache-set OPT1 Set the font cache size (Kb) -font-cache-get Get the speculative font cache size (Kb) -image-cache-set OPT1 Set the image cache size (Kb) -image-cache-get Get the speculative image cache size (Kb) To view the current cache status, you'll need to use the following commands: $ enlightenment_remote -image-cache-get REPLY <- BEGIN REPLY: 4096 REPLY <- END $ enlightenment_remote -font-cache-get REPLY <- BEGIN REPLY: 512 REPLY <- END In other words, the default image cache is around ~4 megabytes, while the font cache is around ~0.5 megabytes. If you wish to change these to something else, you'll need to: $ enlightenment_remote -font-cache-set number $ enlightenment_remote -image-cache-set number Another setting you might want to change is the framerate in which the background layer is rendered. This is also done via $ enlightenment_remote -framerate-get REPLY <- BEGIN REPLY: 30.000 REPLY <- END The default E17 framerate is 30. This can be changed with the following command: $ enlightenment_remote -framerate-set number 6.2 - Configuring via graphical toolsE17 has a preliminary control panel. It does not have all the options that the command-line tool
Each setting has two view modes: basic and advanced. Advanced mode has more options to tweak, while basic keeps everything as simple and user-friendly as possible. Here's a screenshot of the current control panel: 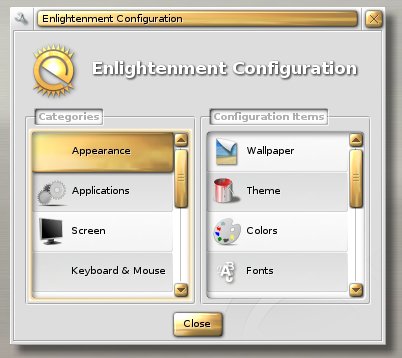
NOTE: Some of the following pages are not 100% complete yet and are subject to change. Please bear with us as we work to add more explanations to these following pages. 6.2.1 - Background SettingsE17 uses binary EDJ format files for backgrounds. These files may also contain animations and various effects. Please check our EDJ backgrounds sections (animated and static) if you want to download some animated or normal static EDJ background files. The E17 background selector can be found from the control panel (under "Configuration" in the main E17 menu). It displays all background EDJ files that are placed in the directory  E17's new Wallpaper Dialog also gives you the option to import different images. Currently jpg and png are supported. You can do this by clicking the  After selecting your image and pressing TODO: Cover gradient options 6.2.2 - Theme SelectorThe E17 theme format is not final. This is why there aren't many themes out yet. Themes will also become unusable if they aren't constantly updated to work with the latest theme format changes. In order to switch to another theme, you can move EDJ theme files to 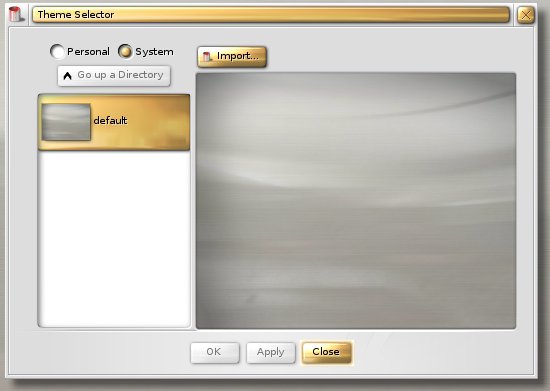 All the graphics for modules that are included with E17 are controlled by the E17 theme file - modules included on the add-on page may require a custom module theme file to be in a certain directory, depending on the module in question. 6.2.3 - Module SettingsModules are configured via the "Configuration" option on the E17 Modules Dialog (shown below), and some modules can be configured by right-clicking the module and selecting 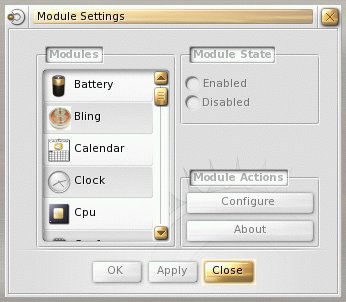 6.2.3.1 - Battery Module This module is a battery meter that uses either ACPI or APM to monitor your battery and AC power adapter status, works under Linux and FreeBSD, but is only as accurate as your BIOS/drivers. When configuring the battery module in Basic Mode, you will see a screen similar to this: 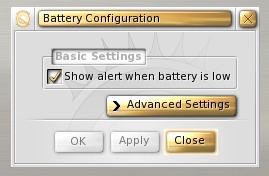
When configuring the battery module in Advanced Mode, you will see a screen similar to this: 
6.2.3.2 - Clock Module This module is an animated clock for your desktop which also includes an optional digital display When configuring the clock module you will see a screen similar to this: 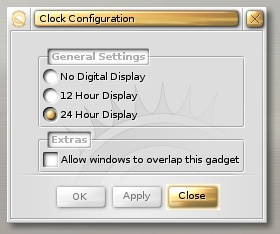
6.2.3.3 - Cpu Frequency Module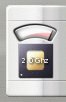 This module is a CPU frequency monitor/controller, especially useful to save power on laptops When configuring the cpu frequency module you will see a menu similar to this:  6.2.3.4 - Dropshadow ModuleThis module enables window and menu dropshadows that are rendered on the background layer When configuring the dropshadow module you will see a screen similar to this: 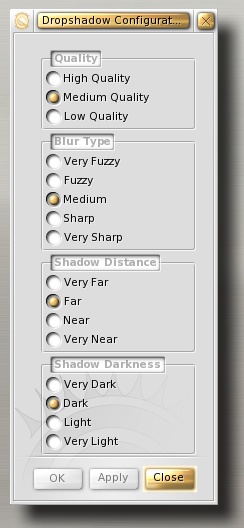 6.2.3.5 - IBar Module This module is an animated application launcher bar When configuring the IBar Module you will see a screen similar to this: 
6.2.3.6 - IBox Module This module is a box that holds icons of minimized applications. It looks a lot like the ibar module When configuring the IBox Module you will see a screen similar to this: 
6.2.3.7 - Pager Module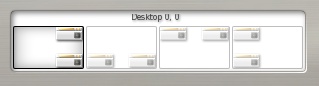 This module displays your virtual desktops and lets you switch between them. When configuring the Pager Module in Basic Mode, you will see a screen similar to this: 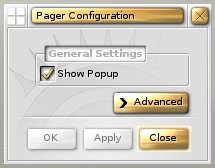
When configuring the Pager Module in Advanced Mode, you will see a screen similar to this:  6.2.3.8 - Start Module This module creates an Enlightenment logo on your desktop that opens the main E17 menu when clicked 6.2.3.9 - Temperature Module This module is monitor that displays the ACPI thermal sensor data on your desktop. When configuring the Temperature Module in Basic Mode, you will see a screen similar to this: 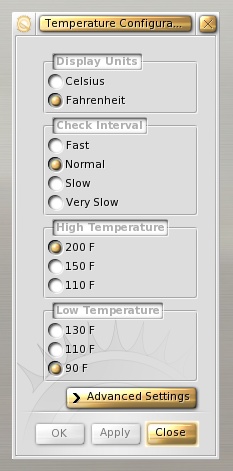
When configuring the Temperature Module in Advanced Mode, you will see a screen similar to this: 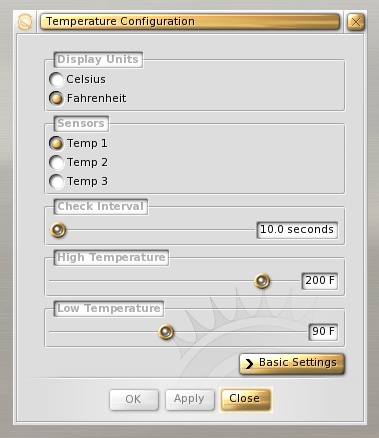
6.2.4 - Desktop SettingsIn virtual desktop environments, windows of running applications can usually be moved from one virtual desktop to another by dragging and dropping with a mouse. Each virtual desktop occupies a defined portion of the screen, and the set of virtual desktops is arranged in a matrix or grid. The size of the matrix depends on the number of virtual desktops. E17 comes configured by default with 4 virtual desktops (4x1) already setup. To configure the number of virtual desktops choose  As you can see, E17 by default has 4 desktops across with 1 row down. To adjust the number of virtual desktops, simply move the sliders and apply. When configuring Desktop Settings in Advanced Mode you should see a screen similar to this:  6.2.5 - Focus Settings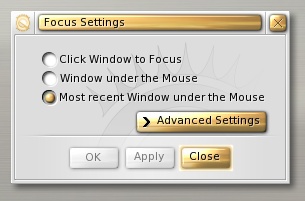 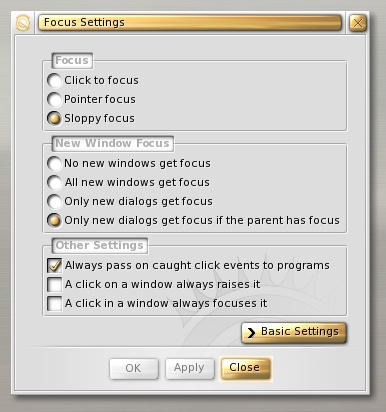 6.2.6 - Menu Settings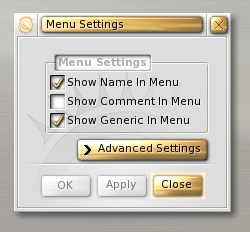 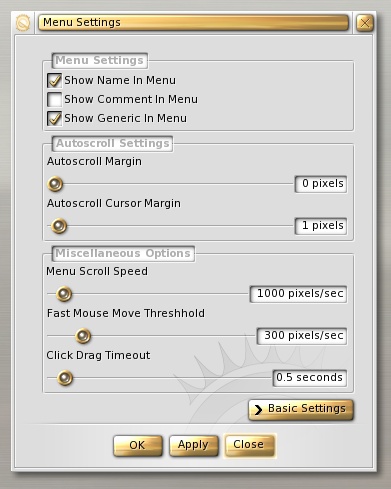 6.2.7 - Performance SettingsE17 is highly scalable. Even with all its graphical effects and animations, it tries to be conservative when it comes to resource usage. There are several ways to tweak performance though. If you have some extra RAM, you may want to increase the E17 font and image caches. This helps reduce swapping, for example if you switch backgrounds often. Another setting you might want to change is the framerate in which the background layer is rendered. When configuring Performance Settings in Basic Mode, you will see a screen similar to this: 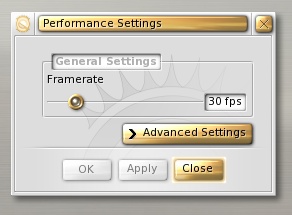 When configuring Performance Settings in Advanced Mode, you will see a screen similar to this: 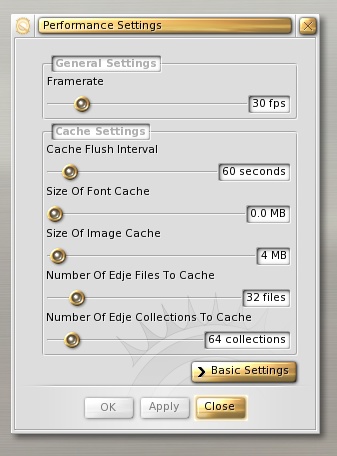 6.2.8 - Window List Settings6.2.9 - Window Display Settings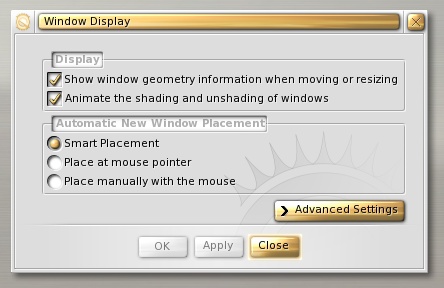  6.2.10 - Window Manipulation Settings  7 - CreditsI would like to thank the following people for their help in making this user guide happen: A Big Thank You to boneyfrog for sending me updated images while I was away. Without his help, this guide may have taken forever. Another Big Thanks to Mark "mos" Hill for his proof reading efforts and for providing connections to others who helped proof this guide. Thanks to Darth_Tux for his efforts in proofing my horid spelling. |
|
||||||||||||||||||
Copyright © Get-E.org
Edit
|
|